Using Cognex VisionPro with GigE Vision Machine Vision Cameras
Preparing for Use
Before you use your camera, we recommend that you are aware of the following resources available from our Downloads page:
- Getting Started Manual for the camera—provides information on installing components and software needed to run the camera.
- Technical Reference for the camera—provides information on the camera’s specifications, features and operations, as well as imaging and acquisition controls.
- Firmware updates—ensure you are using to most up-to-date firmware for the camera to take advantage of improvements and fixes.
Minimum System Requirements
- Gigabit Ethernet host adapter
- GigE Vision compatible camera
- Cognex VisionPro 5.0 or newer
Installation and Configuration
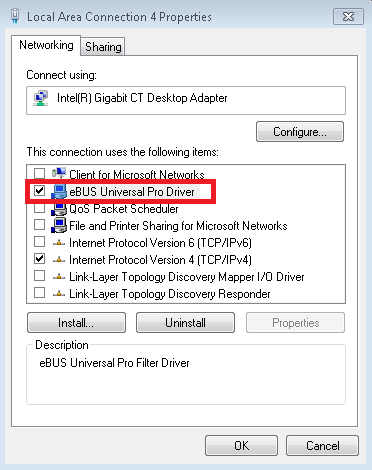
Cognex eBus Universal Pro Driver
The Cognex eBus Universal Pro Driver is a GigE Vision filter driver that must be enabled in order to use GigE cameras in Cognex. This driver operates between the camera and the Microsoft built-in UDP stack to filter out GigE vision stream protocol (GVSP) packets. The CPU does not process all the packets, and therefore reduces CPU usage.
Network Properties Menu
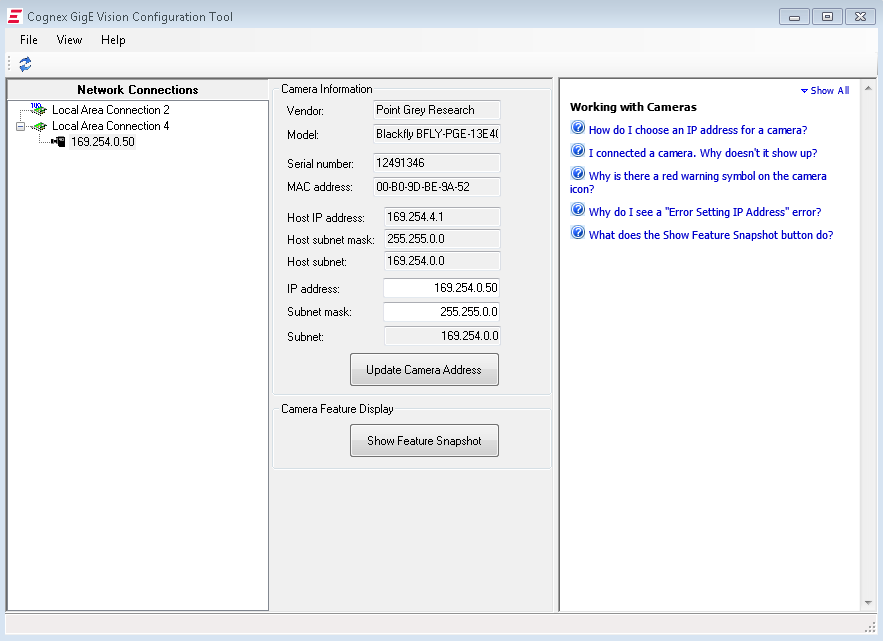
Cognex GigE Vision Configuration Tool
Ensure the camera is enumerated correctly. The host adapter and the camera must be on the same subnet. Users can use the tool to manually set the IP address and the subnet mask of the host adapter or the camera.

Cognex GigE Vision Configuration Tool
Understanding GigE Vision
GigE Vision is a standard for camera control developed for Gigabit Ethernet cameras. All cameras supporting GigE Vision will interact the same way with software supporting GigE Vision such as VisionPro. FLIR GigE cameras such as Blackfly S, Blackfly, Flea3, Grasshopper3, and Grasshopper2 are GigE Vision compatible cameras that work seamlessly with GigE Vision software.
Each camera attribute such as shutter time is controlled by a specific GigE Vision attribute. All GigE Vision software provides a Graphical User Interface (GUI) to control these GigE Vision attributes. The following sections will describe what these controls are in VisionPro and how each control is mapped to the respective GigE Vision attribute.
Running Cognex VisionPro
Start a new Cognex VisionPro QuickBuild project and double click on Image Source and select Camera to bring up the Image Source configuration menu.

Accessing the Image Source menu
In the Image Source configuration menu, users will find 5 different menu tabs that help the user control and configure the camera:
- Settings
- Strobe & Trigger
- Image Properties
- GigE
- Custom Properties
Each of these tabs will be explained in the following sections of this document. Where possible, the GigE Vision equivalent attribute will be described as well.
Settings
The Settings tab is where the basic imaging controls can be found.
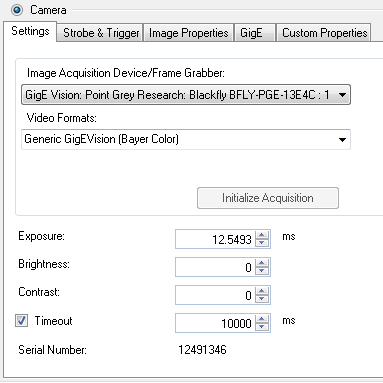
Settings Menu
Exposure – Sets how long the image will be exposed.
Equivalent GigE Vision Attribute: ExposureTime
Brightness – Controls the Black level offset.
Equivalent GigE Vision Attribute: BlackLevel
Contrast – Controls signal amplification.
Equivalent GigE Vision Attribute: Gain
Timeout – The length of time VisionPro will wait for an image to return.
Equivalent GigE Vision Attribute: N/A
Strobe & Trigger
The Strobe & Trigger tab manages the GPIO of the camera.
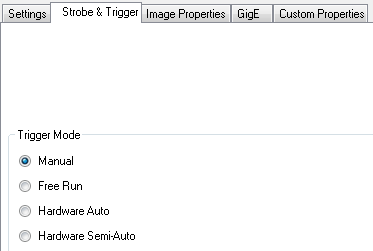
Strobe & Trigger Menu
Manual – VisionPro turns on the camera and transmits an image. Frame rate will be low in this mode.
Equivalent GigE Vision Attribute:TriggerMode = Off
AcquisitionMode = SingleFrame
Free Run – Fee run without any triggering, allowing the camera to run at the maximum frame rate.
Equivalent GigE Vision Attribute: TriggerMode = Off
AcquisitionMode = Continous
Hardware Auto – Hardware trigger mode. Camera will only capture an image when it is externally triggerd.
Equivalent GigE Vision Attribute: TriggerMode = On
AcquisitionMode = Continous
Hardware Semi-Auto – Similar to Hardware Auto mode where an image is only captured when the camera is externally triggered. However, between each acquisiton, the camera will be turned off and on again similar the Manual mode.
Equivalent GigE Vision Attribute:TriggerMode = On
AcquisitionMode = SingleFrame
Image Properties
The Image Properties tab manages the resolution and pixel format of the camera.
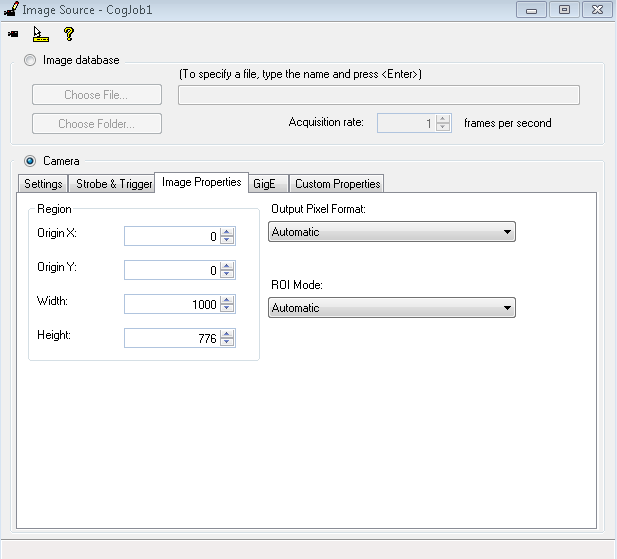
Image Properties Menu
Origin X –Horizontal offset from the origin (in pixels).
Equivalent GigE Vision Attribute:OffsetX
Origin Y – Vertical offset from the origin (in pixels).
Equivalent GigE Vision Attribute: OffsetY
Width – Controls the width of the image.
Equivalent GigE Vision Attribute:Width
Height – Controls the height of the image.
Equivalent GigE Vision Attribute:Height
GigE
This tab allows users to read and write from GigE Vision attributes, if the name of the attribute is known. The basic camera and network information is also displayed in this tab.
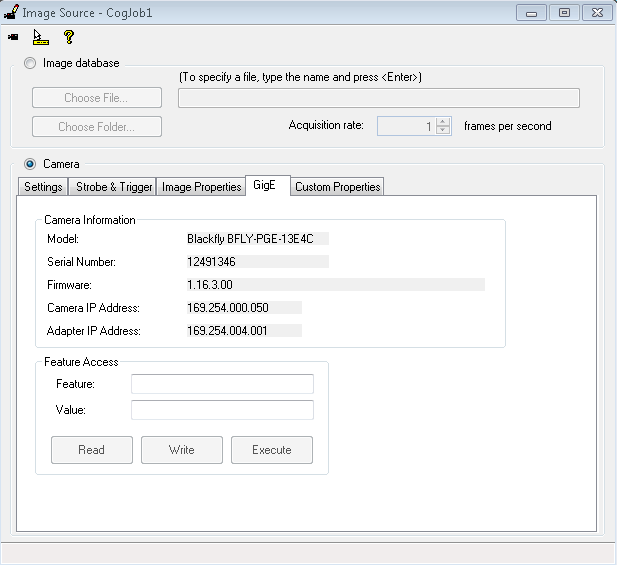
GigE Menu
Feature – GigE Vision attributes name.
Value – Use this field to read or write the GigE Vision attribute values.
Custom Properties
This tab allows users to browse through all the GigE Vision attributes and change them if desired. The attributes in red are attributes that are controlled by VisionPro and cannot be changed from this control menu. For example, the ExposureTime attribute is red because it is controlled by Exposure, under the Settings tab.
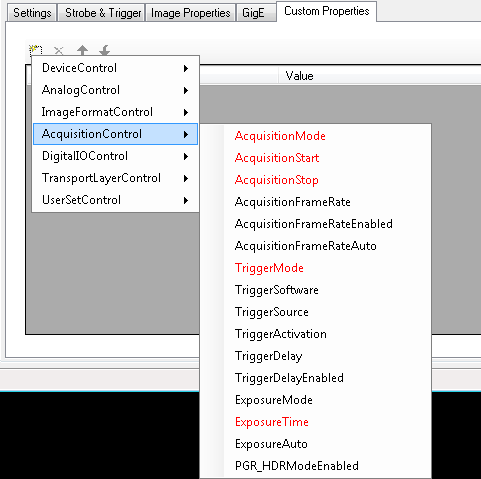
Custom Properties Menu
Once the desired configurations have been set, go back to the Cogjobs window and click on the Live Display icon to enable image display.

Show Live Display
Bandwidth Control
The User Datagram Protocol (UDP) used by the GigE Vision standard provides no guaranteed transmission or fixed timing mechanism. Therefore, bandwidth must be managed by adjusting packet size and packet delay, based on desired resolution and frame rate.
Packet Size (GevSCPSPacketSize)
Packet size influences the number of interrupts generated which affects CPU usage. The larger the packet size, the fewer the interrupts for the same amount of data. To minimize CPU usage, increase the packet size. This attribute can be found in the Custom Properties tab.
The upper limit depends on the host adapter, the Ethernet switches (if used), and the camera.
From the Cognex GigE Vision Configuration Tool, open the Windows Adapter Properties. Adjust the packet size of the host adapter to ~9000 (the standard jumbo packet size). If your adapter does not support such a large packet (or MTU) size, then you will experience slightly higher CPU usage.
Packet Delay (GevSCPD)
The Packet delay acts like a gap between packets during transmission. This delay allows the host to process the current packet before the arrival of the next one. Increasing the packet delay value from zero reduces the effective bandwidth assigned to the camera and also reduces the possibility of dropped frames.
Adjusting Packet Size and Packet Delay
The packet size control is under the GigE tab. The packet delay control is found under the Custom Properties tab. We recommend setting the packet size to the largest packet size supported by the network adapter. Use packet delay to manage the bandwidth allocated to each camera.
Example Code
Capture and Save 10 Images
This example configures, captures (free-running or one_shot mode), and saves 10 (.BMP) images using our GigE Vision cameras. It sets gain to 0 dB and exposure to 20 ms. The user has the option to choose between free running mode and one_shot trigger mode.
Note: if there are multiple cameras, this example allocates bandwidth evenly between each camera
Free Running example (GigE Vision)
Hardware Trigger
This example iterates through all GigEVision cameras and configure them in hardware trigger mode. The application saves an image upon every trigger.
Hardware Trigger example (GigE Vision)
Troubleshooting Tips
XML Cache
When the camera firmware is updated, the XML is often updated as well. To ensure the newest XML file is used, users must manually clear the XML cache. Once the XML file is deleted, VisionPro downloads a new XML file from the camera.
The XML cache file is located in C:\Program Files\Cognex\Common\genicam\cache
Missing Custom Properties
In some cases, a property must be changed from auto to manual in order to access further settings. For example, to set the exposure time, exposure must be in manual mode.
VisionPro loads the current properties, either default or user set, into the Image Source window when the camera is selected. Any changes made to the properties, such as changing from auto to manual, must be reloaded to take effect. To reload, close the Image Source window and reopen.
Changing to a Mode that Changes the Resolution
When changing video modes, the user may implement a binning mode which changes the resolution as well. See Understanding Format_7 region of interest and pixel binning for more information.
To change to a mode that also changes the resolution:
- Connect the camera to the PC.
- Launch the Cognex Vision Pro QuickBuild Application from Start Menu → Cognex → VisionPro → Quickbuild.
- Double-click on Image Source to launch the Image Source and VisionPro QuickBuild Job Editor.
- In the Image Source Configuration window, select Custom Properties tab.
- Add ImageFormatControl->VideoMode, then switch to the desired mode.
- Switch to the Image Properties tab, then change the resolution to the appropriate width/height.
- Exit out of the Image Source window, then in the CogJob1 window, select the Run Job Continuously button.