Getting Started with NI-MAX and LabVIEW
Preparing for Use
Before you use your camera, we recommend that you are aware of the following resources:
Getting Started Manual for the camera—provides information on installing components and software needed to run the camera.
Technical Reference for the camera—provides information on the camera’s specifications, features and operations, as well as imaging and acquisition controls.
Firmware updates—ensure you are using the most up-to-date firmware for the camera to take advantage of improvements and fixes.
Installation and Configuration
The steps for installing and setting up depend which interface your camera uses.
|
FireWire Cameras |
GigE Vision Cameras |
USB3 Vision Cameras |
USB2 Cameras |
|
1. Install NI-MAX and LabVIEW |
1. Install NI-MAX and LabVIEW |
1. Install NI-MAX and LabVIEW |
1. Install NI-MAX and LabVIEW |
|
2. Connect the Camera to the PC |
2. Connect the Camera to the PC |
2. Connect the Camera to the PC |
2. Connect the Camera to the PC |
|
3. Start NI-MAX and Detect the Camera
|
3. Start NI-MAX and Detect the Camera
|
3. Start NI-MAX and Detect the Camera
|
3. Install FlyCapture2 |
|
4. Start NI-MAX and Detect the Camera |
|||
|
4. Start Acquisition |
4. Start Acquisition |
4. Start Acquisition |
5. Start Acquisition |
The following sections provide more detail.
Step 1—Install NI-MAX and LabVIEW
NI-MAX is packaged in the installation of LabVIEW. It is available for download from the National Instruments website.
After downloading LabVIEW, download the Vision Acquisition Software (VAS) which is a set of drivers and utilities used to acquire, display and save images from a wide range of camera types, including cameras using GigE Vision, IEEE 1394, USB 2.0, USB3 Vision, or the Camera Link standard.
Follow the installation instructions.
Step 2—Connect the Camera to the PC
Connect the camera to the PC. For information, see the camera’s Getting Started Manual.
Step 3—Install FlyCapture2 (USB2 cameras only)
For USB2 cameras, the Direct Show filter provided with the FlyCapture2 SDK is required.
To install the FlyCapture2 Direct Show filter:
- Download the FlyCapture2 SDK from the downloads page.
- Follow the installation instructions. Ensure the Direct Show filter is selected during installation.
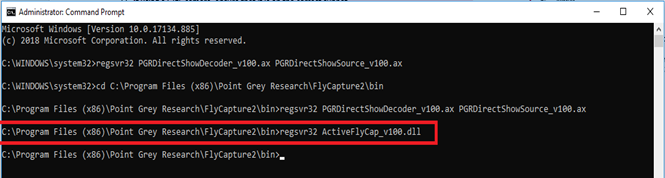
- Open Command Prompt and go to C:\Program Files (x86)\Point Grey Research\FlyCapture2\bin.
- Run regsvr32 PGRDirectShowDecoder_v100.ax PGRDirectShowSource_v100.ax.
If you have FlyCapture2 64x bit installed, then these files are stored in C:\Program Files\Point Grey Research\FlyCapture2\bin64.

Step 4—Start NI-MAX and Detect the Camera
To start NI-MAX:
- Launch NI-MAX.
Start Menu→All Programs→National Instruments→NI-MAX
- Under NI-IMAQdx Devices, select the camera.
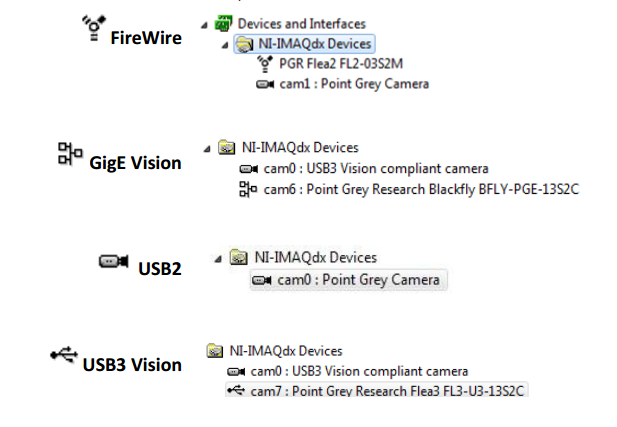
- If your camera is using another manufacturer’s driver, the following message appears when you select the camera:
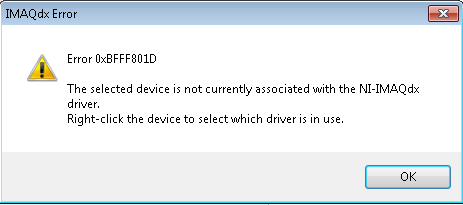
If so, right click the camera and select the driver prefixed by NI-IMAQdx.
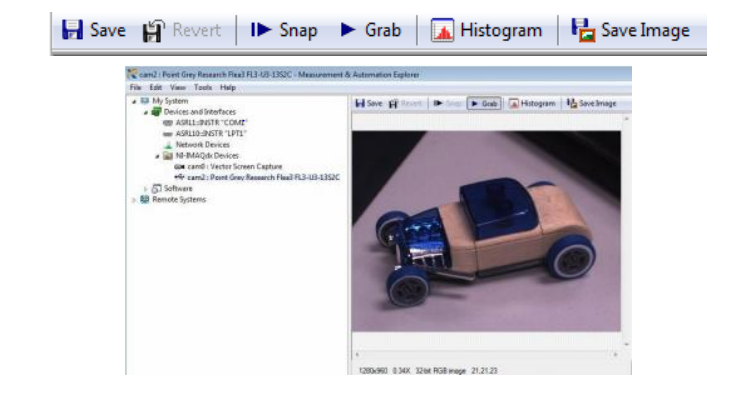
Step 5—Start Acquisition
To start acquisition:
- Click the Grab button in NI-MAX.
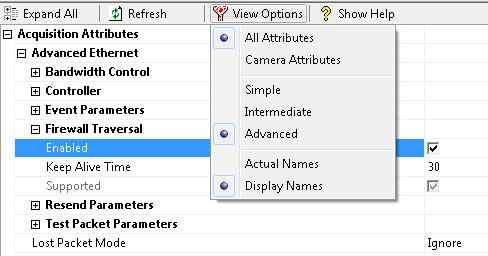
For GigE Vision cameras, if you receive an error that the system did not receive a test packet from the camera you need to enable Firewall Traversal in NI-MAX.
- Click View Options and select All Attributes.
- Browse to Acquisition Attributes→Advanced Ethernet and ensure Firewall Traversal is enabled.
|
|
For USB3 Vision users, more information is available from Using USB3 Vision Cameras with National Instruments' Vision Acquisition Software. |

Programming with LabVIEW
To program using LabVIEW, you can either use the built-in IMAQdx library or access the camera through the ActiveX interface.
|
|
To use ActiveX with LabVIEW users must install the FlyCapture2 SDK. The installation process automatically registers Point Grey’s ActiveFlyCap_v100.dll via the regsvr32 command. |
LabVIEW example source code is available from Knowledge Base Article How do I program my camera in National Instruments (NI) LabVIEW?
Troubleshooting Tips
The following suggestions may help you troubleshoot issues with your camera:
- Update the driver to the latest version.
- Update the firmware to the latest version.
- Update the software to the latest version.
- Perform a soft reboot and if still necessary a hard reboot of the PC.
- Disable then enable the driver.
- Power cycle the camera.
- Power the camera through GPIO, if wiring harness is available.
- Use a separate host controller instead of an integrated one, if available.
- Ensure the card is powered via the 4-pin hard drive connector, if applicable.
- Use a different cable or host controller or PC.
- If using a GigE camera, ensure that it is on the correct subnet.
If ActiveX is not working
- Make sure that if you are using the 32-bit version of LabView, you are using the 32-bit version of FlyCapture2.
- The camera must show up in FlyCapture2 to work using ActiveFlyCap, so cameras on a NI-IMAQdx driver must be switched to a different driver.
- Ensure ActiveX is installed on your PC. From the Command Prompt, go to C:\Program Files (x86)\Point Grey Research\FlyCapture2\bin (default install location) and run regsvr32 ActiveFlyCap_v100.dll.
Update Camera Driver (FireWire and USB3 only)
If the camera driver is not installed properly, the camera does not appear in the NI-IMAQdx Devices list.
To update your driver:
- Connect the camera to the PC.
- Open Device Manager in Windows and locate the camera.
- Right click on the camera and select Update Driver Software.
- Click Browse my computer for driver software.
- Click Let me pick from a list of device drivers on my computer
- Click Have Disk…
- Browse to the driver location and click Open:
- FireWire: C:\Program Files (x86)\National Instruments\NI-IMAQdx\Staging\NI-IMAQdx\niimaqdxk.inf
- USB3: C:\Program Files (x86)\National Instruments\NI-IMAQdx\Staging\NI USB3 Vision\niu3vk.inf