How to upload a neural network to the Firefly DL
Once a neural network file has been successfully converted into a Firefly DL format, users can upload that neural network file onto the camera using SpinView, or through the Spinnaker SDK.
Upload neural network to Firefly DL using SpinView
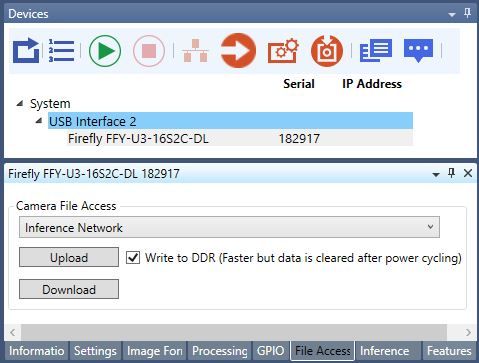
- In SpinView, select the camera in the Devices tab.
- Click on the File Access
- From the Camera File Access dropdown, select Inference Network.
- Click upload, then navigate to/select your desired neural network.
*Note: If Write to DDR is selected, the neural network is loaded onto the DDR which has a quick upload speed but a power cycle of the camera will clear the neural network. If Write to DDR is not selected, the neural network is loaded onto flash memory which has a slower upload speed but a power cycle of the camera will not clear the neural network.
Upload neural network to Firefly DL using Spinnaker SDK
The Spinnaker SDK comes included with example code that showcases how to upload neural networks. The example code Inference can be found in the src folder of the Spinnaker SDK directory. Windows default storage location is C:\Program Files\FLIR Systems\Spinnaker\src. Ubuntu Linux storage location is usr/src/Spinnaker/src.
Test your neural network on Firefly DL with SpinView
- Open SpinView, select the camera, then switch to the inference tab.
- Set the network type to either classification or detection (if you created the neural network through Neurala’s Brainbuilder software, set it to classification).
- Select Inference Enable and Chunk Mode Active.
For classification type neural networks, set Chunk Selector to Inference Confidence, and ensure that Chunk Enable is selected.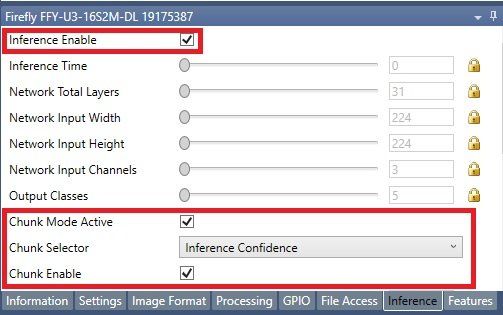
For detection type neural networks, set Chunk Selector to Inference Bounding Box Result, and ensure that Chunk Enable is selected. - [Neurala Brainbuilder only] To set the appropriate Training Mean and Training Scale values for each channel:
- Click on the Features tab.
- Select Inference Processing.
- Select BGR8 for the Training Pixel Format.
- Select Channel 1 in the Network Input Channel, and then set the Training Mean to 127.5 and the Scalar Mean to 255.
- Repeat for Channel2 and Channel3.
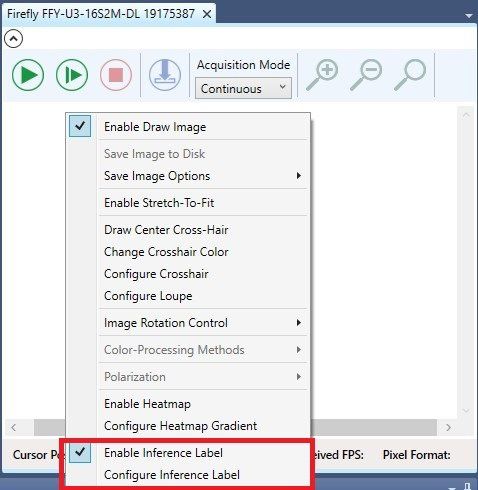
- Right-click on the streaming window, and select Enable Inference Label.
- Click on Configure Inference Label.
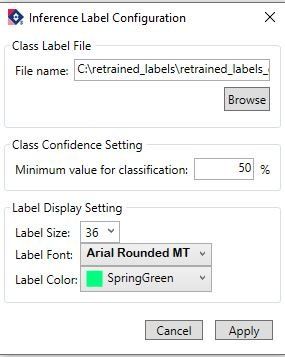
- In the pop up window, click browse to navigate to the label text file and click Apply (if using Neurala’s brainbuilder software, the label text file should come included in the zip file that includes the neural network).
- Click on the green play icon to start camera acquisition.
|
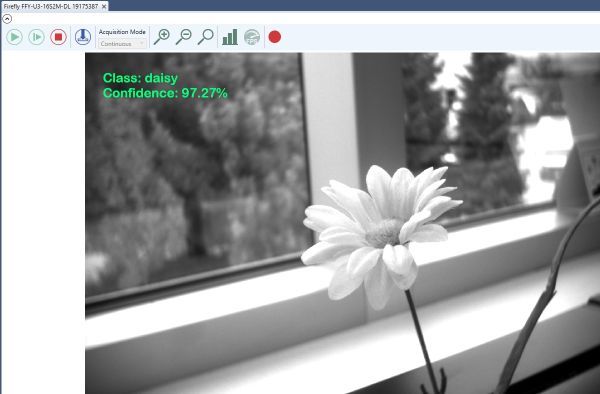
Classification |
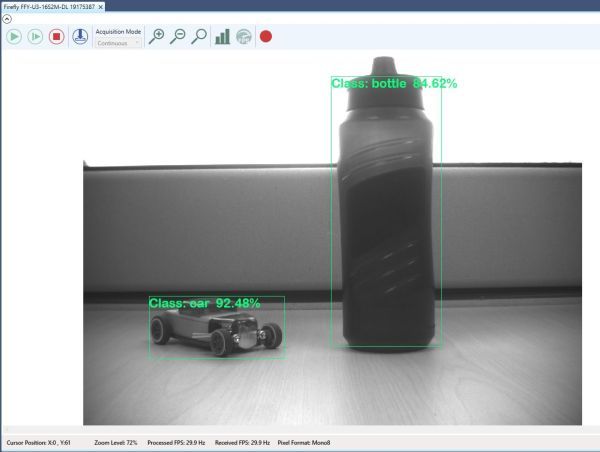
Object Detection |
|
|
|
Save custom settings to camera
To reduce setup time, you can save all of the custom settings you set while testing your neural network, to the camera. to do so:
- Open SpinView, select the camera, then switch to the features tab
- Search for "user"
- Set User Set Selector to "User Set 0"
- Set user Set Default to "User Set 0"
- Click the Execute button beside User Set Save
Following these steps will save your custom settings to the camera, using user set 0. After the camera has been powercycled, the camera will startup with the custom settings you have saved.